It’s hard to select only a few poses that could be considered “essential”, but I find that these are among the ones I practice most frequently. This past week consisted of two flights across the country, five days of steep trail running, and lots of hours in seated meditation, so I was naturally drawn to these poses (or variations thereof), as there is a strong emphasis in this hips, while hitting all the lines of the body. So, if you run a lot, or sit a lot, or you use your body, or if you HAVE a body, this sequence is a must. ENJOY!
How to Practice:
There are four main principles of Yin Yoga. First, we come into a shape and go to the first point of resistance, and from that mild “edge” of sensation, observe what is being felt. The sensation should be no more than a mild, dull ache, and not gravitate toward anything sharp, stabbing, or burning.
The second principle is to remain still. With the muscles relatively relaxed, the stress will transfer to the denser connective tissues. Keep in mind, you are not fixed in a single spot for the duration of the pose. Do be sure to change the angle of the pose to accommodate for any release, or to back away from a sensation that becomes too intense.
Third, yin postures are held for longer periods of time. Postures can be held anywhere from three to even 20 minutes, but start with a time frame that makes sense for you, honoring the foregoing tenets.
Lastly, be sure to release each pose with care. There will likely be a sense of fragility in the body as tissues respond to the stress. Move slowly and mindfully as you transition.
Practice postures sequentially as listed, allowing for 3-6 minutes in each pose. The postures that are suggested to be practiced in a series can be held for less time if needed. Get creative with how you sequence, and be sure to give yourself at least 1-2 minutes between postures to rest in a prone or supine savasana, observing the effect. Static, muscular holds, and even some slow, controlled dynamic movements are also appropriate ways to transition. It is normal to feel some fragility as you exit a posture, and that sensation may stay present for a minute or two.
The Sequence:
1) Butterfly. From a seated position, draw the soles of the feet together, allowing the knees to go wide. Let the feet be further away from the hips, and incline the body forward.
2) Squat. Sit low, sinking the hips, and let the upper body relax forward. Add whatever you may need for support under the heels or hips if the deep flexion in the knees causes too much strain. Upon releasing, come to stand and stay in a forward fold for one minute.
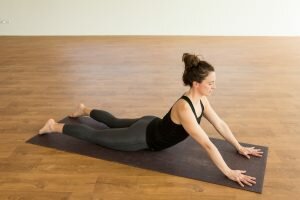
3) Seal. Begin on the forearms in Sphinx pose, and from there, the transition to Seal by fully extending the arms, moving the hands toward the body any amount that allows for an appropriate amount of sensation to the lumbar spine. Hands my turn in or out.
4) Wandering Dragon. Step the right foot forward, planting the hands inside the right leg on the floor or on blocks to target the hip flexor of the back leg, and possibly the groin/inner thigh of the left leg. Hands can be placed on the inside of the right food, and the foot walked out wide to allow for sensation in the right groin. From here, start to walk the hands toward the left to increase the sensation in the side body.
5) Winged Dragon. From Wandering Dragon, move back to the center, and place the right hand on the right thigh and begin to rotate the torso, inviting a heaviness to the back leg, which may create a different line of sensation along the left thigh. As the right leg is gently abducted, the foot may peel off the ground, and there may be more sensation along the inner line of the right leg. The left hand or forearm is on the floor or a block.
6) Screaming Swan. What makes a swan scream, you might ask? It’s the placement of the block toward the knee, allowing the glute to move toward the floor. This shift in angle and alternate relationship to gravity can create a different experience in many bodies, which may become stronger. (please note, the “screaming” is taken lightly, and please do honor the tenets of the practice by holding poses to a mild edge). Targeting the outer hip, take the right knee forward, allowing for an external rotation of the thigh. Place a block or blanket under the thigh, closer to the knee, and experiment with taking the lower leg more parallel to the front edge of the mat. Fold forward to whatever degree you can.
7) Cat Tail. Lie on your right side, supporting your head in your hand. Draw your left leg up, like you’re hanging out reading a magazine. Reach behind you with your left hand and catch ahold of your right foot, targeting the quadriceps of the back leg. Stay on your side, or rollback (as shown in the photo), to invite a twist to the spine.


